Moving your website can feel like moving your entire house – exciting, but also incredibly daunting. The fear of losing precious data, experiencing extended downtime, or breaking something critical often keeps website owners rooted to an underperforming host, even when they know a change is long overdue. But what if I told you that migrating your website doesn’t have to be a nightmare? What if there was a methodical, step-by-step approach that virtually eliminates the risks of data loss and downtime?
In this deep-dive guide, we’re going to demystify the website migration process. We’ll cover everything from the initial planning stages to the final checks, ensuring your website makes a smooth, safe, and successful journey to its new digital home. Whether you’re moving from shared hosting to a VPS, upgrading to a dedicated server, or simply switching providers for better performance and support, this guide is your essential roadmap.
Let’s embark on this migration journey with confidence!
Why Migrate Your Website Anyway?
Before we dive into the “how,” it’s worth quickly touching on the “why.” Understanding your motivation can reinforce the importance of a careful migration. Common reasons include:
- Poor Performance: Slow loading times, frequent outages, or an inability to handle traffic spikes.
- Lack of Features: Your current host might not offer the tools, resources, or specific technologies your growing website needs.
- Subpar Support: Unresponsive or unhelpful customer service can be a huge headache when issues arise.
- Security Concerns: Your current host might have a history of breaches or inadequate security measures.
- Cost Savings: Finding a host that offers better value for money without sacrificing quality.
- Scalability Issues: Your website has outgrown its current hosting environment.
- Consolidation: You might want to move multiple websites to a single, more manageable host.
Whatever your reason, a successful migration hinges on meticulous planning and execution.
The Golden Rules of Website Migration
Before we get into the nitty-gritty, let’s lay down some fundamental principles:
- Backup, Backup, Backup: This cannot be stressed enough. Before you touch anything, make multiple full backups.
- Plan Meticulously: A rushed migration is a recipe for disaster. Take your time.
- Test Thoroughly: Don’t assume everything works. Verify every aspect of your site.
- Minimize Downtime: The goal is a seamless transition, ideally with zero noticeable downtime for your users.
- Communicate: Inform your users if you anticipate any downtime (though with proper planning, this should be minimal).
Now, let’s break down the migration process into manageable steps.
Step 1: Pre-Migration Planning and Preparation
This is arguably the most critical phase. Success here dictates the smoothness of all subsequent steps.
1.1 Choose Your New Host Wisely
Don’t just pick the cheapest option. Research thoroughly. Consider:
- Performance: Look for SSD storage, ample RAM, good CPU resources, and a robust network.
- Scalability: Can the host accommodate your future growth?
- Support: Read reviews about their customer service. Do they offer 24/7 support? What channels (chat, ticket, phone) do they use?
- Security: What security measures do they have in place (firewalls, malware scanning, backups)?
- Features: Do they offer cPanel/Plesk, SSH access, specific PHP versions, easy SSL integration, staging environments?
- Location: A server closer to your target audience can improve loading times.
- Migration Services: Does the new host offer free migration assistance? This can be a huge time-saver, especially for complex sites.
1.2 Audit Your Current Website
Before you pack your bags, know exactly what you’re moving.
- List All Files and Databases: Understand the full scope of your site.
- Check Disk Space Usage: How much space does your current site occupy? Ensure your new plan has ample room.
- Note Current PHP Version and Other Software: Ensure your new host supports these or is compatible. For example, if your site uses PHP 7.4, ensure the new host supports at least that version, preferably offering an upgrade path.
- Identify Custom Configurations: Are there any special
.htaccessrules, cron jobs, or server-level settings you need to replicate? - Review DNS Records: Make a list of all current DNS records (A, CNAME, MX, TXT) – you’ll need these later.
- Inventory Plugins/Themes (for CMS like WordPress): Are there any outdated or unnecessary ones you can remove to lighten the load?
1.3 Clean Up Your Website
Think of this as decluttering before you move house.
- Delete Unused Files/Plugins/Themes: Get rid of anything you don’t need.
- Optimize Your Database: Many CMS platforms accumulate bloat. Optimize your database (e.g., using a plugin like WP-Optimize for WordPress).
- Compress Images: Ensure all images are optimized for web performance.
- Clear Caches: Empty any caching plugins or server-side caches.
1.4 Inform Your Team (and Users if Necessary)
If you have a team working on the website, ensure everyone is aware of the migration schedule. For larger, high-traffic sites, a brief heads-up to users about potential (though hopefully minimal) maintenance might be prudent.
Step 2: Backing Up Your Entire Website (The Absolute Must-Do)
This is your safety net. Do not skip or rush this step. Create at least two separate full backups.
2.1 Full File Backup
This includes all your website’s files: HTML, CSS, JavaScript, images, scripts, themes, plugins, uploads – everything in your public_html (or equivalent) directory.
- Via cPanel/Plesk: Most control panels offer a “Backup” or “Backup Wizard” feature. This is often the easiest way to download a full file backup.
- Via FTP/SFTP: Connect to your current host using an FTP client (like FileZilla) and download all files from your website’s root directory to your local computer. This can take a long time for large sites.
- Via SSH (for advanced users): If you have SSH access, you can use commands like
tar -czvf backup.tar.gz /path/to/your/websiteto create a compressed archive quickly.
2.2 Database Backup(s)
Your database contains all your dynamic content – blog posts, user comments, product information, settings, etc.
- Via phpMyAdmin (most common):
- Log into your cPanel and find
phpMyAdmin. - Select your website’s database from the left sidebar.
- Click on the “Export” tab.
- Choose “Custom” for more options.
- Select all tables.
- Ensure “SQL” is selected as the format.
- Check “Add DROP TABLE / VIEW / PROCEDURE / FUNCTION / EVENT / DEFINER statement.”
- Select “gzipped” or “zipped” compression for large databases.
- Click “Go” to download the
.sql(or.sql.gz) file.
- Log into your cPanel and find
- Via cPanel/Plesk Backup Feature: Often, the full backup option will also include your database.
- Via Command Line (for advanced users):
mysqldump -u username -p database_name > backup.sql
Crucial: Store these backups in a safe place, preferably on your local machine and perhaps an external drive or cloud storage. Do NOT rely solely on your old host’s backups, as you might lose access after cancellation.
Step 3: Setting Up Your New Hosting Environment
Once you have your backups, it’s time to prepare the new home.
3.1 Create Necessary Accounts
- New cPanel/Plesk Account: Your new host will provide access.
- FTP Account: Create an FTP user for your website’s directory.
- Database and Database User:
- Go to “MySQL Databases” in your new cPanel.
- Create a new database (e.g.,
new_database_name). - Create a new database user (e.g.,
new_db_user) with a strong password. - Add the new user to the new database and grant all privileges. Make a note of the database name, username, and password – you’ll need these to update your website’s configuration.
3.2 Upload Your Website Files
Now, we transfer your website files to the new host.
- Via cPanel File Manager: If your backup is a single
.zipor.tar.gzfile, you can often upload it directly via the File Manager, then right-click and “Extract” it into yourpublic_htmldirectory. This is generally the fastest method. - Via FTP/SFTP: Connect using your new host’s FTP details and upload all your files to the
public_htmldirectory. This can be slow for large sites. - Via SSH: If you have SSH access and your backup is a compressed archive, you can upload it via SCP or use
wgetif it’s hosted publicly, then extract it.
3.3 Import Your Database
This brings your content back to life.
- Via phpMyAdmin:
- Log into phpMyAdmin on your new cPanel.
- Select the new database you created.
- Click on the “Import” tab.
- Click “Choose File” and select your
.sql(or.sql.gz) database backup file. - Ensure the format is “SQL.”
- Click “Go.”
3.4 Update Your Website’s Configuration File
This is a critical step, especially for CMS platforms like WordPress, Joomla, or custom applications. Your website needs to know its new database connection details.
- For WordPress: Edit the
wp-config.phpfile (located in your website’s root directory). You’ll need to update:DB_NAME(new database name)DB_USER(new database username)DB_PASSWORD(new database password)DB_HOST(usuallylocalhost, but confirm with your new host)
- For Joomla: Edit the
configuration.phpfile. - For other CMS/custom apps: Consult their documentation for the relevant configuration file (often named
config.php,settings.php, or similar).
Save the changes after editing.
3.5 Update Internal Links and URLs (if necessary)
If your old website used “http” and the new one uses “https,” or if you’ve changed your domain name (though this guide assumes the domain remains the same), you might need to update internal links within your database.
- For WordPress: Use a plugin like “Better Search Replace” or “Velvet Blues Update URLs” after migrating, or perform a manual search-replace directly in the database (use caution with manual methods). You’ll replace
old_domain.comwithnew_domain.com(even if it’s the same domain, this refreshes the paths).- Example SQL query (use with extreme caution and after another backup):SQL
UPDATE wp_options SET option_value = REPLACE(option_value, 'http://olddomain.com', 'http://newdomain.com') WHERE option_name = 'home' OR option_name = 'siteurl'; UPDATE wp_posts SET guid = REPLACE(guid, 'http://olddomain.com','http://newdomain.com'); UPDATE wp_posts SET post_content = REPLACE(post_content, 'http://olddomain.com', 'http://newdomain.com'); UPDATE wp_postmeta SET meta_value = REPLACE(meta_value,'http://olddomain.com','http://newdomain.com'); - Replace
wp_with your actual table prefix if it’s different.
- Example SQL query (use with extreme caution and after another backup):SQL
Step 4: Testing Your Website on the New Host (Without Going Live)
This is crucial for identifying issues before your users see them. You need to view your site on the new server while your old site is still live and accessible.
4.1 Edit Your Local Hosts File
This is a clever trick. By editing your computer’s hosts file, you can tell your browser to look at the new server’s IP address when you type in your domain name, even though the public DNS still points to your old host.
- Find Your New Host’s IP Address: Your new host will provide this (e.g., in your welcome email or cPanel sidebar).
- Edit
hostsfile:- Windows: Navigate to
C:\Windows\System32\drivers\etc, openhostswith Notepad (run as Administrator). - Mac/Linux: Open
/etc/hostswith a text editor (usingsudo).
- Windows: Navigate to
- Add a line:
NEW_SERVER_IP yourdomain.com www.yourdomain.com- Example:
192.168.1.1 yourwebsite.com www.yourwebsite.com
- Example:
- Save the file.
- Clear Browser Cache: Restart your browser or clear its cache.
Now, when you type yourdomain.com into your browser on your computer, it will load the site from the new server, while everyone else still sees the old one.
4.2 Thoroughly Test Everything
Go through your website with a fine-tooth comb:
- Navigation: Click every menu item and link.
- Images & Media: Ensure all images, videos, and other media load correctly.
- Forms: Test all contact forms, submission forms, login forms.
- Dynamic Content: Check blog posts, comments, product pages, search functionality.
- E-commerce: If applicable, perform a test purchase (add to cart, checkout process, payment gateway).
- User Accounts: Log in with different user roles if your site has them.
- Plugins/Add-ons: Ensure all third-party functionalities are working.
- Responsive Design: Check how the site looks on different screen sizes.
- Broken Links: Use a broken link checker (though manual checks are still valuable).
- Speed: Use tools like GTmetrix or PageSpeed Insights to check the performance on the new host (you might need to temporarily change your DNS or use a specific server IP address for testing these tools).
Address any issues you find before proceeding. This is the time to fix them.
Step 5: Updating DNS and Going Live
Once you’re confident everything works perfectly on the new server, it’s time to direct your traffic there.
5.1 Lower Your TTL (Time To Live)
If you can, about 24-48 hours before your planned DNS change, log into your current domain registrar (or wherever your DNS is managed) and lower the TTL for your domain’s A records to a very short period (e.g., 300 seconds or 5 minutes). This ensures that when you do change your DNS, the new settings propagate much faster across the internet. After the migration is complete, you can revert it to a higher value (e.g., 3600 or 86400 seconds).
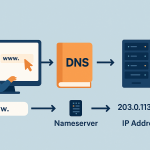
5.2 Change Your Nameservers (Recommended for Full Host Migration)
This is the most common and generally easiest way to point your domain to a new host.
- Log into your domain registrar (e.g., GoDaddy, Namecheap, Cloudflare).
- Find the “Nameservers” section for your domain.
- Replace your old host’s nameservers with the new host’s nameservers (they will provide these, typically something like
ns1.newhost.comandns2.newhost.com). - Save the changes.
5.3 Point Your A Record (Alternative for Specific Scenarios)
If you’re only changing where your website files live but keeping DNS management elsewhere (e.g., Cloudflare), you might just update the A record to point to your new host’s IP address.
- Log into your DNS provider.
- Edit the A record for
yourdomain.comandwww.yourdomain.comto point to your new host’s IP address.
5.4 DNS Propagation
Once you change your nameservers (or A records), it takes time for these changes to update across the internet’s DNS servers. This is called “DNS propagation.” It can take anywhere from a few minutes to 48 hours, though typically it’s much faster.
During this period, some visitors will still see your old site, while others will see your new site. This is why having your old site remain active during this transition is crucial for minimizing downtime.
You can monitor propagation using tools like DNS Checker.
5.5 Revert Your Local Hosts File
Once you’ve changed the DNS, remember to remove the line you added to your local hosts file so your computer also sees the publicly updated site.
Step 6: Post-Migration Checks and Cleanup
You’re almost there! A few final steps to ensure everything is perfect.
6.1 Final Website Review
Once DNS has fully propagated (and you’ve removed the hosts file modification), visit your website to confirm everything loads from the new host.
- Check all internal links, images, forms, and dynamic content again.
- Use an online tool (like a “What’s my IP” tool) to verify your domain is resolving to the new server’s IP address.
6.2 Configure Email (if applicable)
If your email accounts were tied to your old hosting, you’ll need to set them up on the new host or update your MX records to point to a third-party email service (like Google Workspace or Zoho Mail). This is a common point of oversight, so don’t forget it!
6.3 Set Up SSL Certificate
Your new host likely offers a free SSL certificate (e.g., Let’s Encrypt). Install and activate it immediately to ensure your site is secure (https://). Redirect all HTTP traffic to HTTPS.
6.4 Re-Add Custom Server Configurations
Any special .htaccess rules, cron jobs, or environment variables you noted in Step 1 need to be re-implemented on the new server.
6.5 Monitor Performance and Logs
Keep an eye on your website’s performance, server resource usage, and error logs for the first few days or weeks. This helps catch any hidden issues.
6.6 Update Google Search Console & Analytics
If your IP address has changed, it’s a good practice to update this information in Google Search Console. Also, ensure your Google Analytics code is correctly implemented and tracking data from the new server.
6.7 Cancel Old Hosting Account (After a Buffer)
Do NOT cancel your old hosting account immediately. Keep it active for at least a week or two after successful migration and full DNS propagation. This provides a safety net if anything goes wrong and you need to revert or access old data. Once you’re absolutely certain everything is stable on the new host, then you can confidently cancel your old account.
Common Pitfalls to Avoid
- Not Backing Up Enough: Seriously, one backup isn’t enough.
- Rushing the Process: Haste makes waste. Take your time.
- Forgetting Email Migration: This is a common source of post-migration panic.
- Ignoring Database Prefix Changes: If your old database had a specific prefix (e.g.,
wp_) and your new host enforces a different one, you’ll need to adjustwp-config.phpand potentially run database queries to update table names. - DNS Caching Issues: Sometimes, your local computer or ISP might cache old DNS records. Clearing browser cache and flushing DNS on your computer can help.
- Ignoring PHP Version Compatibility: Ensure your new host’s PHP version is compatible with your website’s code.
- Not Testing Thoroughly Enough: Assume nothing works until you’ve verified it.
When to Consider Professional Migration Services
While this guide aims to empower you to handle migration yourself, there are situations where hiring a professional or utilizing your new host’s migration service is a wise choice:
- Very Large, Complex Websites: E-commerce sites with vast inventories, membership sites, or custom applications.
- Lack of Technical Confidence: If the thought of editing files or working with databases makes you nervous.
- Time Constraints: If you simply don’t have the time to dedicate to a careful migration.
- Specific Server Migrations: Moving from a highly customized dedicated server to another, which might involve complex server configurations.
Many reputable hosting providers offer free or low-cost migration services as part of their package. It’s always worth asking them if this is an option!
Conclusion
Migrating your website to a new host without losing data is a process that demands patience, precision, and a systematic approach. By following the steps outlined in this comprehensive guide – from meticulous planning and thorough backups to rigorous testing and careful DNS updates – you can ensure a smooth transition for your website and its valuable content.
Remember, the goal is not just to move your site, but to move it better. Embrace the opportunity to clean up, optimize, and set your website up for greater success on its new, improved hosting environment. Happy migrating!