Shared hosting is the entry point for millions of websites, and for good reason: it’s incredibly affordable, easy to set up, and requires minimal technical knowledge. It’s the perfect starter home for your digital dreams.
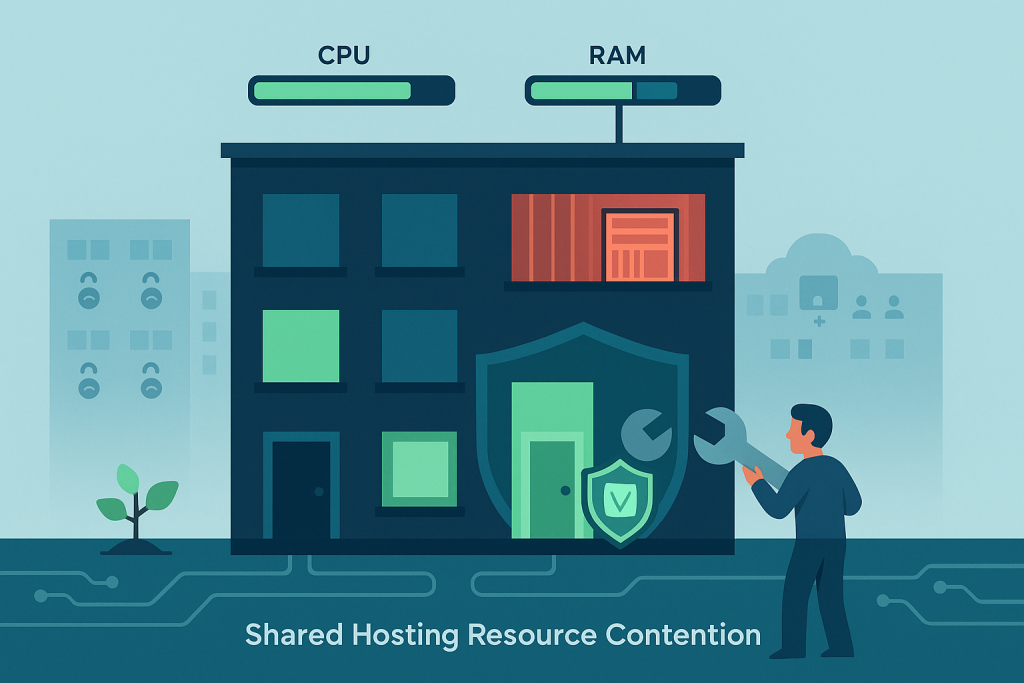
But just like a crowded apartment building, living on a shared server comes with its own set of neighborhood drama. You’re sharing finite resources—CPU, RAM, and disk I/O—with dozens, sometimes hundreds, of other tenants (websites). The result is a mix of frustrating, performance-killing, and occasionally alarming issues.
This isn’t just a list of problems; it’s a deep-dive, value-added guide for every shared hosting user, from beginner to experienced webmaster. We’ll expose the five most common and severe issues, explain why they happen on a shared environment, and provide genuinely actionable, detailed fixes that go far beyond “just upgrade.”
Let’s turn those frustrating error messages and slow loading times into a blueprint for a faster, more stable website.
1. The Blistering Slowdown: Performance and Load Speed Issues
The single most common complaint about shared hosting is, “My site is slow!” This isn’t just an annoyance; a slow site drives away visitors, hurts your search engine rankings, and kills your business.
Why It Happens on Shared Hosting
The core problem is Server Overload and Resource Throttling.
- The Noisy Neighbor Effect: If one website on your server suddenly gets a massive spike in traffic (a successful viral post, a DDoS attack, or a poorly optimized script), it can hog the shared CPU and RAM. This immediately slows down your site, even if you’re doing everything right.
- Strict Resource Limits: To prevent the above, hosting providers use tools (like CloudLinux LVE) to set hard limits on how much CPU, RAM, and I/O (Input/Output) your account can use. When you exceed this small limit—even briefly—your website is temporarily throttled, leading to slow loading or the dreaded 508 Resource Limit is Reached error.
The Fix: Optimizing Everything You Can Control (The 80/20 Rule)
Since you can’t control your neighbors, you must ruthlessly optimize your own property. This is where you get 80% of your performance back.
Step 1: Implement Aggressive Caching (The Single Biggest Win)
Caching saves a static copy of your website pages so the server doesn’t have to rebuild them from scratch for every single visitor.
- For WordPress Users: Install a top-tier caching plugin like WP Rocket (paid, but worth it) or LiteSpeed Cache (free, and excellent if your host uses LiteSpeed servers). Configure it to use browser caching, page caching, and object caching if available.
- For Non-CMS Sites: You’ll need to configure caching rules directly in your server’s configuration file (e.g., the
.htaccessfile for Apache). Look up “Leverage Browser Caching” rules for your specific server type.
Step 2: Optimize Your Images
Unoptimized images are the #1 performance killer. A single 5MB, high-resolution photo on a web page is an act of digital violence.
- Resize Before Upload: Never upload a 4000px image if it will only display at 800px. Resize it on your computer first.
- Compress: Use a plugin (like Smush or Imagify for WordPress) or an online tool (TinyPNG) to losslessly compress your images, drastically cutting file size without losing noticeable quality.
- Lazy Loading: Enable lazy loading for images and videos, which ensures media files only load when the user scrolls down to see them.
Step 3: Minify and Combine Files
Your website uses multiple CSS (styling) and JavaScript (functionality) files. Each file requires a separate trip to the server.
- Minify: Use your caching plugin to minify these files—removing unnecessary characters, white space, and comments—to make them smaller.
- Combine/Defer: Combine multiple small CSS and JS files into fewer larger ones (reducing HTTP requests). Crucially, defer or delay the loading of non-essential JavaScript until after the main content is visible.
Step 4: Audit and Prune Plugins/Themes
Every extra plugin or theme you install adds code that the server has to process.
- Delete Unused Items: Deactivate and delete any themes or plugins you aren’t actively using. Don’t just deactivate them.
- Test Performance Impact: If you suspect a plugin is the culprit for slowdowns, temporarily deactivate it and run a speed test (using a tool like GTmetrix or Google PageSpeed Insights). If the score jumps, you’ve found your noisy neighbor. Find a lighter, more efficient alternative.
2. The Unseen Threat: Shared Security Risks and Cross-Site Contamination
In a shared hosting environment, you’re connected to dozens of other users. While modern hosts use isolation technology, the risk of a breach on a neighboring site affecting yours—known as Cross-Site Contamination—is a real and unique vulnerability.
Why It Happens on Shared Hosting
The issue stems from the shared operating system and server environment.
- Lateral Movement: If a hacker breaches a poorly secured website on the server, they might look for vulnerabilities that allow them to move laterally (hop folders) to other accounts or elevate their privileges.
- Shared IP Blacklisting: All sites on the server share a single IP address. If a neighboring site is hacked and starts sending thousands of spam emails, that shared IP can be blacklisted by services like Spamhaus. Suddenly, your legitimate business emails start bouncing, and your site’s reputation takes a hit—through no fault of your own.
The Fix: Fortifying Your Digital Borders (Defense-in-Depth)
You must secure your site to the highest standard to insulate yourself from external threats and internal server vulnerabilities.
Step 1: Mandate Strong and Unique Credentials
This is the weakest link for any site.
- Use Complex Passwords: Use a password manager to generate a unique, long (12+ characters), and complex password for your cPanel/hosting account, your FTP account, and your WordPress/CMS admin login.
- Two-Factor Authentication (2FA): Enable 2FA on your hosting control panel and your CMS admin area immediately. This makes it virtually impossible for a hacker to log in, even if they guess your password.
Step 2: Keep Everything Updated (The Firewall Against Known Attacks)
Outdated software is the primary entry point for hackers.
- Core CMS/Application: Always run the latest stable version of your CMS (WordPress, Joomla, etc.).
- Plugins and Themes: Update all plugins and themes as soon as a security patch is released. Check that they are actively maintained by their developers. If a plugin hasn’t been updated in over a year, delete it.
Step 3: Implement a Website-Level Firewall (WAF)
A Web Application Firewall (WAF) inspects incoming requests and filters out malicious traffic (like SQL injection or brute force attacks) before it reaches your site’s code.
- Use Cloudflare: Use a free Cloudflare account (or similar CDN/Security service). Cloudflare acts as a proxy, hiding your server’s true IP address and filtering out malicious traffic, including basic DDoS attacks.
- Security Plugin (CMS Only): For WordPress, use a plugin like Wordfence or Sucuri. The free versions often include basic login security and a malware scanner.
3. The Digital Traffic Jam: Entry Process and Database Limits
This issue often occurs during peak traffic times or when a legitimate search engine crawler is indexing your site. It manifests as slow response times and, eventually, a 508 Resource Limit is Reached error.
Why It Happens on Shared Hosting
Your host limits the number of tasks (processes) your account can run at once.
- Entry Processes (EP): This is the number of concurrent PHP processes (scripts) your account is executing. In simple terms, it’s roughly the number of concurrent visitors your site can serve at a single moment. Shared hosts might limit this to a low number like 20-30. If 31 users hit your site simultaneously, the 31st person gets an error.
- Database Connections: Your host also limits the number of simultaneous connections your website can make to its database (e.g., MySQL). A poorly coded plugin or theme can open connections and forget to close them, quickly reaching this limit and crashing the site.
The Fix: Reducing Concurrent Demand
The solution is to make each visitor’s request complete faster and reduce the total number of requests.
Step 1: Offload Static Resources with a CDN
A Content Delivery Network (CDN) like Cloudflare or KeyCDN stores copies of your static files (images, CSS, JS) on servers all over the globe.
- Benefit: When a user visits your site, the CDN serves these files instead of your shared server. This drastically reduces the load on your server’s CPU and I/O, freeing up your Entry Processes for critical tasks like dynamic page generation. This is one of the most effective ways to mitigate the 508 error.
Step 2: Tune Your Database
The database is where the core of your website lives, and slow queries can consume your connection limit.
- Optimize Tables: Use tools like phpMyAdmin (available in your cPanel) to optimize your database tables. For WordPress users, plugins like WP-Optimize or a feature in your caching plugin can perform regular clean-ups (removing spam comments, old revisions, and transient data).
- Check
DB_HOST: In some shared hosting setups, using the IP address of your MySQL server instead oflocalhostin your configuration file (likewp-config.php) can sometimes result in faster connections by bypassing a network lookup. Your host’s support team can confirm the correct connection string.
Step 3: Check and Limit Cron Jobs
A cron job is a scheduled task (like an hourly backup or a broken link check). If a cron job runs a demanding script too often, it can spike your resource usage and exhaust your Entry Processes.
- Audit Your Cron Jobs: Check the cron job section of your cPanel. Look for any scripts running every minute or every five minutes. See if you can safely adjust them to run less frequently (e.g., daily or every 12 hours).
4. The Email Disaster: Spam, Blacklisting, and Delivery Issues
It’s an old problem, but a serious one: your transactional emails (order confirmations, password resets, contact form messages) are suddenly going straight to the spam folder.
Why It Happens on Shared Hosting
This is an extension of the shared IP blacklisting issue (Point 2).
- Shared Mail Server: Your host’s mail server is also shared. If another user on your server is sending spam, the entire mail server’s IP address gets a bad reputation. This bad reputation is contagious, and major email providers (Gmail, Outlook) start classifying your legitimate emails as spam.
- Outgoing Limits: Shared hosts put strict limits on the number of emails you can send per hour (often 250-500) to prevent a single spammer from crippling the server.
The Fix: The Professional Outbound Email Solution (SMTP)
The fastest, most reliable fix is to stop using your shared host’s email server for outgoing mail altogether.
- Use a Dedicated SMTP Service: Implement a dedicated transactional email service like SendGrid, Mailgun, or Amazon SES. These services specialize in high-volume, high-deliverability email and use dedicated IP addresses with pristine reputations.
- Configuration: You’ll install a simple plugin (like WP Mail SMTP for WordPress) that intercepts all outgoing emails and routes them through the professional service instead of your shared host’s server. This is a crucial upgrade for any serious website.
5. The Critical Failure: Backups and Restoration Issues
You make a small coding error, an update breaks your site, or a hacker gets through your defenses. The most critical question is: can you restore your site right now? Relying solely on your shared host’s backup is a gamble.
Why It Happens on Shared Hosting
Shared hosts provide “courtesy” backups, not a guarantee.
- Infrequent Backups: Your host might only back up your data once a week, or once a month. If your site breaks on a Tuesday, you could lose five days of data.
- Limited Retention: They might only keep a few days’ worth of backups, and retrieving them can sometimes involve a fee or a slow support ticket.
- The “Whole Server” Problem: A host’s main focus is backing up the entire server, which means your individual restoration might take a back seat.
The Fix: Taking Personal Ownership of Your Data
Backups are your insurance policy; you must control them completely.
Step 1: Implement Daily, Off-Site Backups
Never rely on a single backup source.
- Automated Plugin/Tool: Use a dedicated backup tool or plugin (UpdraftPlus, Duplicator) that can create a full site backup (files and database) on a daily or hourly basis.
- Off-Site Storage: Crucially, set the backup to save to an off-site location like Google Drive, Dropbox, or Amazon S3. If the server fails completely, your backup is safe and sound elsewhere.
Step 2: Master the One-Click Restore
Practice restoring your site from a recent backup to a staging environment. If you use a tool like UpdraftPlus, the restoration process is simple, user-friendly, and fully under your control—meaning you can be back online in minutes, not hours.
Beyond the Fixes: When Is It Time to Upgrade?
You can solve 90% of shared hosting problems with the advanced optimizations above. However, there is a hard ceiling. If you find yourself consistently hitting resource limits (508 errors) despite all your efforts, your website has simply outgrown its starter home.
A good rule of thumb for upgrading:
| Sign You Have Outgrown Shared Hosting | The Next Step to Consider |
| You regularly hit your CPU or Entry Process limits (508 errors). | Managed VPS or Cloud Hosting: Dedicated resources (CPU/RAM) just for you, which eliminates the “noisy neighbor” effect. |
| You exceed your monthly visitor threshold (typically 25,000+ per month) and load times are slowing down. | Managed WordPress Hosting: Highly optimized for a single CMS, offering built-in caching and security layers. |
| You need to install specialized software, manage server-side security, or require root access. | Unmanaged VPS/Cloud: Full control over the server environment, but requires strong technical knowledge. |
Shared hosting is an excellent choice to start, but your success will eventually require you to move to a solution that scales with your traffic. Until then, implement these fixes to get the most speed, stability, and security out of your current plan.
Your website deserves the best shot at success, and by taking proactive steps to manage these common shared hosting issues, you are taking control of your digital destiny.